


DIY is what I do, and I’ve most certainly done it all.
My problem is I don’t have finished pictures of most of it or much in between.
The most ambitious project we did was the addition we did to our house in Del Norte.
Now, if you want one with pictures, it was the building of our pantry.
So, here’s the background on that.
One of the reasons we purchased this house was because it had a formal dining room. As formal dinning rooms go, it was rather small. But out table and hutch fit into it. And at the time, it seemed important that we have one.
As it turned out, we almost never used the room.
Flash forward almost two dozen years.
My gorgeous bride has gone downstairs to get something. A large chunk of our finished basement has been used as a pantry, which is okay. She comes up and on the top wrung catches her foot and falls. We’re at that age where a fall could mean the ICU which could mean ICU later.
This was the second or third time this had happened. She says she wished we could bring all that upstairs. This where I had one of my rare insights of immense logic.

“Well,” I said. “We have the formal dining room that we never use. Why not convert it?’
Surprise. It made sense to her, too. Somehow, it didn’t surprise me that she already had a plan in her head.
And so it began. First order of business was to get rid of the furniture out of there. Our eldest daughter was more than happy to take it.
I then cut out the carpet and built a wall separating it from the formal living room. That was the easy part. The hard part was about the start.
The formal dining room was one of the few rooms in the house that had an overabundance of Power outlets. We wanted to keep them. But according to the plans my wife had drawn up, most of them would be behind cabinets. That involved a whole day of cutting into the drywall. feeding wire down to the existing outlets, and putting everything together.
NOTE IF YOU WANT TO TRY THIS: Always make sure you kill the power first. While I didn’t get shot across the room on this project, I have in the past. See. You can teach an old dog new tricks!
With the done, we brought in the cabinets and installed them. The real challenge was putting on the handles. Julie had purchased the handles she wanted and truthfully, I was a little apprehensive about drilling the holes. You know the old adage, measure twice, cut once. Well, I could measure a million times, and it would still be wrong. She ordered this handy little template from Amazon. It worked perfectly.
The real challenge was the cabinet tops. We opted for butcher block purchased from our local Home Depot. They had to order it them special for us. The first time the tops came in; they were so badly damaged they were useless. So, we tried again. Again, they arrived damaged, but it was just one end (which was going to be cut off anyway). I still expressed my displeasure and they all but paid me to take them away.

The last piece was the shelves and for the life of me, I couldn’t see Julie’s vision. We had cabinets hanging above and then the walls of the shelves affixed to them. Basically, the shelve walls were hanging down. They would not be fixed to the walls or the floor. I couldn’t see how she intended this to be stable.
I just did as she asked. It wasn’t until I started putting in the shelves that I understood what she was aiming for. It was the shelves that kept everything in place. The structure was so stable that I’d need an ax to knock it down.
Finally came the click in place flooring. I almost lost my salvation on that one. I tried putting it down late in the day and was getting more and more frustrated. Julie told me to call it a night. The next day, she told me to try it a different way. I did and got the hang of how to do that, it worked fine. The trick to the flooring was I was doing it from the front of the piece I was laying. That doesn’t work. You knell so it’s facing away. You fit it into the slot and then just push down a little. Click! it’s in place.
Total time spent on project, Demo to completion – 4.5 days.
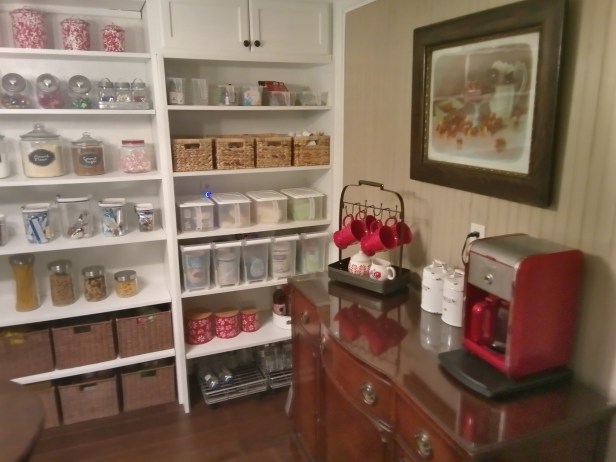
Cost – Less than $900.00. Most of that expense went for cabinets and flooring. The glass you see on the buffet above was custom cut for us by Hogue Glass here in Greeley.
Today, what was a room we went into rarely is a room we go into often.
Discover more from William R. Ablan, Police Mysteries
Subscribe to get the latest posts sent to your email.

Getting old sucks. This post reminded me of what I already knew. Great job on completing the project. Most of what I do do is FYI since my husband who is almost two years younger than me uses age as why he can’t/ won’t/shouldn’t do it.
LikeLiked by 1 person
Well, wow!
LikeLiked by 2 people
The final boss of DIY projects, amazing work!
LikeLike
Thank you. We’re about to indulge on another, This time we’re putting in a countertop gas range and a wall mount double oven and microwave. but first, the powder room. Be posting that when done.
LikeLike